Blog of science and life
Shynet - Website analytic thay thế cho Google
I. Giới thiệu
Nếu các bạn chưa biết thì hiện nay đang có trend khá nổi trên cộng đồng mạng là từ bỏ các công cụ của các tập đoàn lớn như Google, Facebook, Apple, Amazon etc... nhằm mục đích lấy lại tự do cho các internet user, chặn sự xâm phạm quyền riêng tư và bảo mật của người dùng.
Nhưng cá nhân mình thì thấy chẳng có lý do gì để làm thế, trừ khi một dịch vụ bắt trả quá nhiều tiền để sử dụng hoặc có quá nhiều quảng cáo, thì mình mới ko dùng.
Còn lại thì thời đại vẫn cứ đổi thay, và như các công ty lớn đó làm vậy cũng nhằm mục đích chính là nâng cao trải nghiệm người dùng. Chứ mình thì ko tin vào mấy cái thuyết âm mưu cho lắm.
Dù sao thì mình cũng đã tìm hiểu 1 vài thứ thay thế cho các công cụ trên, không phải vì mình lo về privacy mà đơn giản là nhu cầu dùng của mình chỉ đến vầy.
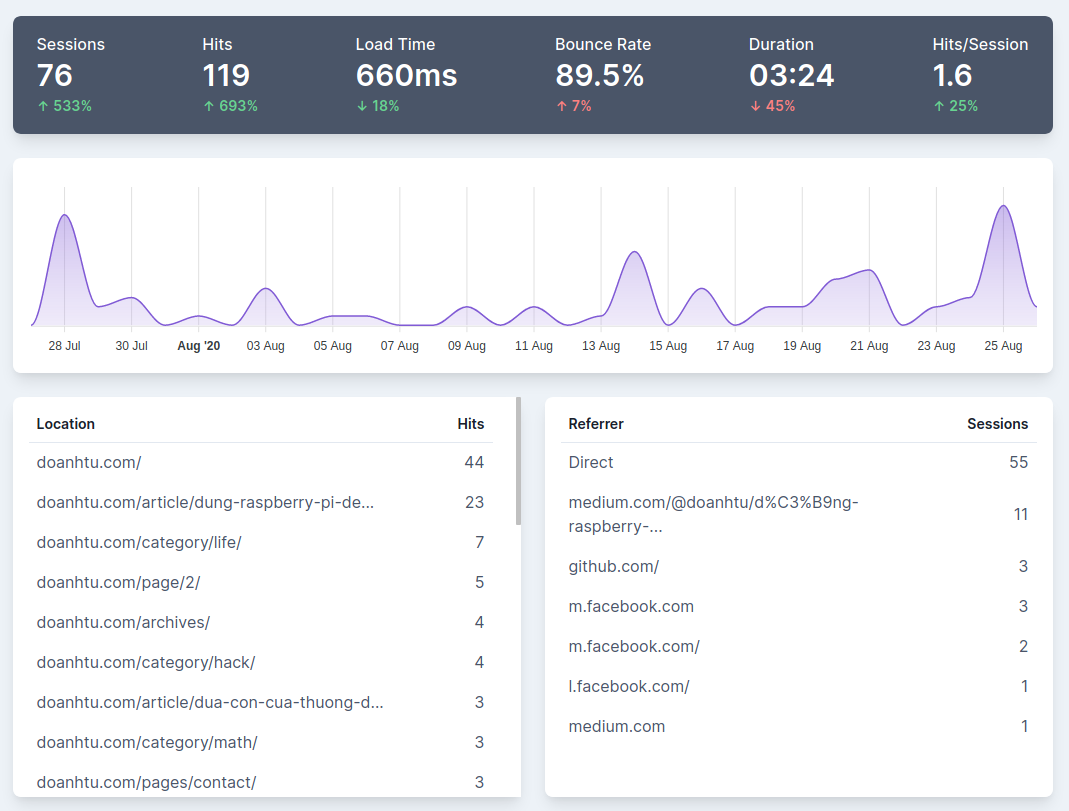
Đơn cử như trang blog này, nhu cầu của mình chỉ là đếm xem có bao nhiêu lượng truy cập, bài nào đươc xem nhiều nhất, và ngày nào có lượt xem tăng cao.
Chấm hết. Không cần đến Google Analytic.
Nên mình đã tìm hiểu và quyết định chọn Shynet
II. Hướng dẫn
Mình chọn Shynet cũng 1 phần vì nó được viết bằng Django, mà mình thì dùng Django cũng được 4 - 5 năm rồi nên có vấn đề gì cũng sẽ dễ custom và fix.
Để deploy Shynet khá dễ vì giờ đã có Docker.
Đầu tiên là cần 1 server. Bạn có thể dùng Digital Ocean (Link affiliate, bạn sẽ có $100 dùng trong 60 ngày, còn mình sẽ được $25)
Nên chọn Ubuntu 18.04 cho stable. Sau đó là cài Docker và Docker compose
Sau đó chạy các command:
sudo apt install nginx
mkdir shynet
cd shynet
touch .env
touch docker-compose.yml
File docker-compose.yml
version: '3'
services:
  shynet:
    image: milesmcc/shynet:latest
    ports:
      - "8009:8080"
    depends_on:
      - db
    env_file:
      - .env

  db:
    image: postgres:latest
    expose:
      - "5432"
    environment:
      - POSTGRES_USER=shynet
      - POSTGRES_PASSWORD=secret_password
      - POSTGRES_DB=shynet_db
    volumes:
      - shynet-db:/var/lib/postgresql/data

volumes:
  shynet-db:
File .env:
# This file shows all of the environment variables you can
# set to configure Shynet, as well as information about their
# effects. Make a copy of this file to configure your deployment.

# Database settings (PostgreSQL)
DB_NAME=shynet_db
DB_USER=shynet
DB_PASSWORD=secret_password
DB_HOST=db
DB_PORT=5432

# General Django settings
DJANGO_SECRET_KEY=random_secret_key

# For better security, set this to your deployment's domain. Comma separated.
ALLOWED_HOSTS=*

# Set to True (capitalized) if you want people to be able to sign up for your Shynet instance (not recommended)
ACCOUNT_SIGNUPS_ENABLED=False

# Should user email addresses be verified? Only set this to `required` if you've setup the email settings and allow
# public sign-ups; otherwise, it's unnecessary.
ACCOUNT_EMAIL_VERIFICATION=none

# The timezone of the admin panel. Affects how dates are displayed.
TIME_ZONE=America/New_York

# Set to "False" if you will not be serving content over HTTPS
SCRIPT_USE_HTTPS=True

# How frequently should the monitoring script "phone home" (in ms)?
SCRIPT_HEARTBEAT_FREQUENCY=5000

# How much time can elapse between requests from the same user before a new
# session is created, in seconds?
SESSION_MEMORY_TIMEOUT=1800

# Should only superusers (admins) be able to create services? This is helpful
# when you'd like to invite others to your Shynet instance but don't want
# them to be able to create services of their own.
ONLY_SUPERUSERS_CREATE=True

# Whether to perform checks and setup at startup, including applying unapplied
# migrations. For most setups, the recommended value is True. Defaults to True.
# Will skip only if value is False.
PERFORM_CHECKS_AND_SETUP=True

# The port that Shynet should bind to. Don't set this if you're deploying on Heroku.
PORT=8080
Rồi chạy docker-compose up -d. Voila, bạn đã có shynet service chạy trên port 8009.
Để tạo superuser để quản lý và set hostname
III. Reverse proxy
Chúng ta sẽ dùng nginx làm reverse proxy
Tạo 1 file /etc/nginx/sites-available/shynet như sau:
server {
     listen 80;
     server_name example.com;  # Domain của bạn

     location / {
         proxy_pass http://localhost:8009;
         proxy_set_header X-Real-IP $remote_addr;
     }
 }
Rồi chạy
ln -s /etc/nginx/site-available/shynet /etc/nginx/site-enabled
nginx -t
systemctl restart nginx
Và thế là ta đã có 1 service chạy analytic cho bất cứ web nào ta muốn.